Calibration
The XL3 Acoustic Analyzer meets the specifications listed in the XL3 Technical Data.
Calibration of the measuring device
To ensure that your measuring device meets the published specifications, we recommend an annual calibration of the XL3 together with the measuring microphone. During calibration, the specifications are checked, differences from the last calibration are pointed out, and the complete frequency response of the microphone is verified.
Microphone sensitivity calibration
The NTi Audio measurement microphones with ASD functionality include an electronic data sheet. This allows the XL3 to automatically detect the sensitivity and calibration data of the connected NTi Audio measurement microphone. The electronic data sheet is displayed in the function menu under Calibration.
Environmental conditions
Prior to calibration, the sound level meter and calibrator should be exposed to stable environmental conditions for the following typical acclimatization periods:
-
10 minutes after a temperature change of ±10 °C;
-
15 seconds after a 5 kPa change in ambient static air pressure;
-
10 minutes after a change of the relative humidity by 30% without condensation.
The calibration procedure and correction data apply within these environmental conditions:
-
Temperature: –10 to +50 °C (14 to 122 °F);
-
Static air pressure: 65 to 108 kPa;
-
Humidity: 25 to 90 % r.h. without dew points from –10 to +39 °C (14 to 102 °F).
In case of deviating ambient conditions, observe the relative correction values specified in the certificate of the calibrator.
Ambient noise
Make sure that during a calibration with a reference level of 94 dB (or 114.0 dB), the ambient noise level is less than 69 dB (or 89 dB, respectively).
Calibration screen
Swipe the touchscreen from top to bottom and tap the ![]() icon to open the calibration screen.
icon to open the calibration screen.
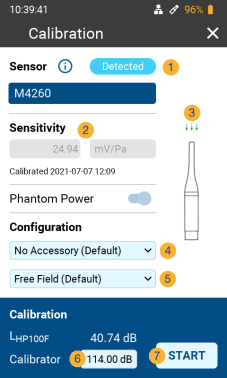
Calibration menu with ASD measuring microphone connected
|
|


 and
and  .
.Calibration menu without sensor connected
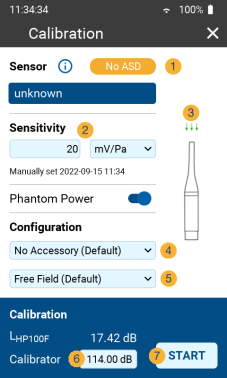
|
|
|
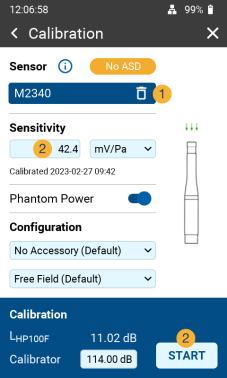
If a microphone without ASD is connected to the XL3, you may have to erase the ASD-information from the previously connected microphone first. To do so, connect the non-ASD microphone to the XL3, and
|
Custom calibration
Follow these steps to calibrate the sensitivity of your NTi Audio measurement microphone or microphone amplifier or other microphone:
-
Enter the Calibrator Level
 according to the instructions on your calibrator. Thereby, please observe the correction values for the calibrator used and your microphone type as described in chapter Free-field correction;
 -
Plug the calibrator onto the microphone and switch on the calibrator;
-
Tap
 START to start the calibration;
 -
The Calibration: Calibration running... window appears and changes to Calibration: Successfully finished after the calibration has been successfully performed.
Customer calibration - Manual sensitivity adjustment
If no ASD microphone is connected and no calibrator is available, you can also set the sensitivity of the sensor used manually:
-
Tap the field under "Sensitivity"
 and enter the microphone sensitivity;
 -
Select the associated unit (V/Pa, mV/Pa or μV/Pa);
-
Tap OK.

|
As soon as you reconnect a measuring microphone with ASD functionality, the manually entered level is replaced by the sensitivity stored in the ASD chip. |
|
|
User Sensitivity However, if the measured sensitivity deviates from the factory calibration by ±1.5 dB for a Class 1 measurement microphone or by ±3.0 dB for a Class 2 measurement microphone, the XL3 will display the following message: Measured sensitivity too far (xx dB) from factory settings. Check calibration level and microphone! |