Commissioning
Power supply
You can power the XL3 in several ways:
-
Replaceable, rechargeable Li-Ion battery (supplied with the XL3);
-
Mains voltage adapter (supplied with the instrument);
-
USB-C cable.

|
The battery is approximately half charged when delivered and should be fully charged before using the XL3 for the first time. |
Li-Ion battery
The protected and certified Lithium-Ion battery must only be used in the XL3. No other use is permitted. To insert the battery into the instrument, insert it into the battery compartment with the plastic tab first and let it snap into place.
|
|
In order to minimize the battery charging time it is recommended to leave the XL3 switched OFF during charging. |

|
Safety information when handling the Li-Ion battery pack:
|
Operation with mains adapter
The supplied power supply is able to completely power the XL3 in all functions. In this configuration, you may leave the battery in the instrument. The power manager of the XL3 prevents from overcharging the battery. When switched off, the charging time for full charge is app. 3 hours. It prolongs when the XL3 is in use during charging.
|
|
Switched power supply with 9 VDC / 2 A with international adapters for EU, UK, US, AU. CAUTION: Non-original mains voltage adapters may affect the measurement results. Damages caused by the use of a non-original power supply is excluded from warranty. |
|
|
External DC power supply Voltage: 5.8 – 17.0 VDC Power: minimum 6 W Connection: 2.1 x 5.5 x 9.5 mm Polarity: Positive pole on inner contact |
Supply via USB cable
Fundamentally, a USB connection supplies sufficient power to operate the XL3. Should the battery charged in parallel during operation, it is recommend to use an USB-C connection with 3 A rating, allowing to fully charge the battery in less than 3 hours. When using a USB-C 1.5 A rated supply, the charging time is extended to about 6 hours, while with a USB-2 connection with a rated power of 500 mA, the battery is only charged slowly when the device is turned off – no charging is possible during operation of the instrument in this configuration.
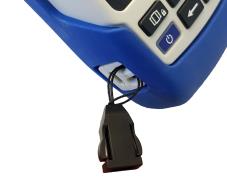
Attach hand strap / Kensington lock
A hand strap is included to secure it during work. This puts the XL3 firmly in your hand.
|
|
Fold-out stand
The practical device stand is located on the back of the XL3. Unfold the wire stand to place the meter in a convenient reading position on a table.
Acoustic measurements
For acoustic measurements, connect an NTi Audio measuring microphone to the XLR input socket  in Overview / Interfaces. The microphone is connected directly with the XLR connector, or via an XLR ASD cable to the XL3.
On / Off
Press the  key for approx. 2 seconds to switch on the device; after start-up, the XL3 is ready for operation. Pressing the On/Off key again briefly during operation switches the display ON or OFF, respectively. To switch OFF the XL3, you must press and hold the On/Off key for approx. 3 seconds.
System settings

|
You can open the system settings in two ways:
... and then select the settings icon This opens the System Settings, which includes all global settings such as storage method, network connections, color scheme, language, time, options and device-specific information. Tap on the respective menu item to open the corresponding setting. |
 .
.General
Language
Select your preferred language in this sub menu. The language setting changes all menus (if available – otherwise English appears).
Time zone
The date and time of the XL3 are synchronized – as soon as available – with the internet time via the NTP protocol. Therefore, there is no possibility to change the date or time manually.
However, you can select the time zone (e.g. Europe/Berlin) so that the device time matches your local time.
Decimal separator
For numerical display and storage, make the selection between "." (period) or "," (comma).
Save
After completing a measurement, you can save the obtained results in three different ways on the XL3.
| manually |
Here, the user is responsible for saving the recorded measurement results. As soon as the measurement has been finished, the Save Result dialog will open. Therein, you may edit the Folder, Name and Comment. After that, tap on CANCEL to abandon or on OK to save a report. Manual saving is useful, for example, if you are performing trial measurements and do not always want to save all the results.
|
||
| prompt |
In this mode, after the measurement is finished, the Save Result dialog appears with the Folder (save location) and the file Name. Before you confirm with "OK", you can add a note (Comment) or cancel the saving with CANCEL. Select this mode if you want to decide situational, whether the measurement results should be saved or if you want to add a comment to your measurement data in each case. |
||
|
automatic |
In this mode, the measurement results are written automatically – i.e. without user interaction – to the SD-card in the predefined project Folder. The file Name has the format yyyy-mm-dd_SLM_nnn, where nnn is a sequential number that increases automatically with each subsequent save operation. Select this mode if you want to be sure that all measurement data are always stored. |

Color scheme
Select the color scheme that suits you:
-
"dark" – white font on dark gray background;
-
"blue" – white writing on blue background;
-
"light" – black font on white background.
Display timeout
Select the duration after which the display automatically switches OFF when not in use. Six time-limited increments are available from 5" (five seconds) to 60' (one hour) and "never" (no timeout).
As soon as you touch the switched-off display, it becomes active again.
Connections
You can connect the XL3 to the internet in three ways:
-
Directly via the built-in Wi-Fi transmitter / receiver;
-
Via a LAN network using a USB Ethernet adapter or a PC;
-
Via a mobile data connection; for this, the XL3 requires an external gateway connected to the USB connector and connected using the NDIS protocol.
Regardless of the type of connection, the network LED ![]() provides information about the status of the connection.
provides information about the status of the connection.
|


|
|
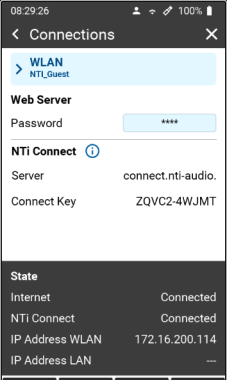
This setup shows the current status of the Wi-Fi connection and the assigned IP address of the device. The IP address is important for the connection with the web server. Under NTi Connect you may see the URL of the connection server and the unique connection key of your XL3. This key and the to be defined password are the required elements for a connection to the instrument via NTi Connect. In an internal LAN you may also use the IP address to connect instead.
|
| Web Server |
In this menu you can define the password. The web server is automatically enabled when a password is defined – otherwise, it is disabled |
|
LAN |
As soon as an Ethernet connection has been established via LAN on the USB port, the network icon in the top line of the display changes to |
 and the IPv4 address is displayed. This address must be known in order to be able to address the
 Installed options
|
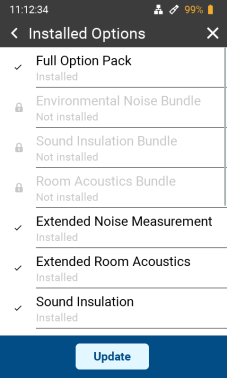
You can see here a list of all options that are installed & enabled in this XL3. Active options are displayed in black font – grayed out options are not active. All available options for the XL3 can be installed on your device via the my.nti-audio.com portal on-line or through your NTi Audio distributor. |
Rechargeable battery
This menu shows you the current battery status and – if connected – the type of the external power supply (USB or Power Adapter).
In case of a Battery failure, the related error message is shown as well.
About this device
Under this menu item you will find:
-
The serial number of the device;
-
The selectable device name (factory setting: "My XL3");
-
The installed firmware version and the indication if this version is up-to-date, or if a newer version is available for download (XL3 must be online).
Selection of the measurement function
Tap the ![]() selection menu at the top left of the display.
selection menu at the top left of the display.

|
You will then see a list of all available measurement functions. Tap on the desired function so that it is loaded. Detailed descriptions of the respective measuring functions can be found in the corresponding chapters.
|
|
|
For a general functional check and for ensuring best possible measurement accuracy, we are recommending to check the sound level meter together with the microphone, using a sound calibrator before executing measurements. Instructions for this can be found under Calibration. |