Operation
The XL3 offers the latest technologies with a large color touchscreen and an additional keypad for safe and intuitive operation. In addition, you can also control the entire XL3 remotely via a web browser.
Operation via the keypad
With the keypad you control the basic functions of the instrument, such as starting or stopping a measurement, switching between different displays or pages, or moving the cursor within a chart view (e.g sound level spectrum).


|
Switches between the result views. Press and hold the button to lock the touchscreen. |

|
Press the On/Off key for approx. 2 seconds to switch ON the XL3. During operation, press the On/Off key briefly to switch the display ON or OFF (but not the meter). When the display is switched OFF, the key shows the state of the instrument:
To switch OFF or to restart the XL3, press the On/Off key for approx. 3 seconds. |

|
Moves the cursor horizontally (left / right) within a chart view (e.g spectral display). |

|
The ESC key terminates any selection and closes the open window. The cursor returns to the main menu. |

|
By pressing the OK button you confirm the current cursor selection, as for instance the measurement function or the parameters. |

|
Starts a measurement. |

|
Stops the current measurement. |

Operation via the display
You can operate the XL3 easily and silently via the touchscreen. In addition to simple inputs, the touchscreen also supports swipe gestures to change the displayed page.
A long press on the key locks (or unlocks) the touchscreen to prevent accidental operation.
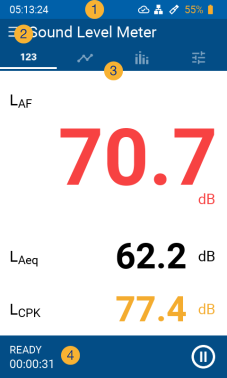
The display of the XL3 is divided into the following function segments:
|
|

|
The status bar displays general information such as the time of day, network status, microphone connection and battery status. Swipe down to expand this area. |

|
Tap on the Main Menu to select the required measurement function (available measurement functions depend on the installed options). |
|

|
Display area of the measurement results. The preferred display can be selected by swiping left/right on the touchscreen, or via the |
|

|
Current status (e.g. "READY", "LOGGING" or "PAUSE"), together with elapsed time of the ongoing measurement. |
The status bar

Always shows the current time of the device on the left. The time is automatically synchronized with the internet via the NTP protocol when there is a network connection.

|
|
||||||||||||||||||||||||||||||||||||||||||||||||||||

|
|
||||||||||||||||||||||||||||||||||||||||||||||||||||

|
|
||||||||||||||||||||||||||||||||||||||||||||||||||||

|
|
||||||||||||||||||||||||||||||||||||||||||||||||||||

|
|
||||||||||||||||||||||||||||||||||||||||||||||||||||

|
|


Quick settings
Swipe down across the display to get access to the quick settings.
|
|
|
Record screenshot – tap this icon to record a PNG picture of the current screen; alternatively, you may also press the two arrow keys |
|
|
System settings | |
|
|
Calibration screen | |
|
|
Connections | |

|
Rechargeable battery | |

|
Display brightness – move the slide controller to the left (darker) or right (brighter) to adjust the brightness of the LCD. |

Data access and remote control via web browser
For detailed instructions on how to set up and use the web browser for data access, please refer to chapter Data transfer.