How to Test Audio Quality in a Smart Device
How do manufacturers, repairers and re-furbishers test the quality of the acoustic responses of the microphones and speakers in smart devices?
Smart devices such as smart speakers, mobile devices, personal assistants, smart thermostats, smart security cameras and similar have entered the consumer market during the last couple of years. More and more household appliances are getting connected to the smart home network. Most of those devices have an audio interface, such as built-in loudspeakers or microphones to interact with the user. Some of them even deliver impressive audio quality. The number of smart devices produced is rapidly growing in this emerging market.


1) The challenge
In a traditional microphone test, the microphone under test is placed at a fixed distance from a calibrated signal-generating speaker. The signal received by the microphone is fed directly into the Audio Analyzer, producing the results.
In a traditional loudspeaker test, the loudspeaker under test is placed at a fixed distance to a calibrated measurement microphone. A known signal is played by the loudspeaker, received by the measurement microphone, and fed directly into the Audio Analyzer, producing the results.
These two traditional tests are known as “Closed Loop” circuit tests. The test signal comes from the Audio Analyzer, passes through the signal chain of the device under test and back into the Audio Analyzer with little or no delay.
However, when testing smart devices, a closed loop measurement is often not possible, as those devices don’t have designated audio input and output connectors necessary to interrupt the signal chain and separately measure the microphone and the loudspeaker on the device. That is, we can’t get direct access to the wires at the back of the microphone or the loudspeaker without potentially destroying the device.
2) The solution
The solution is to use an “Open loop” test setup, where, for the microphone test, the results are recorded by the device under test (DUT) itself, and, for the loudspeaker test, the test signal is produced by the DUT itself.
3) In practice…
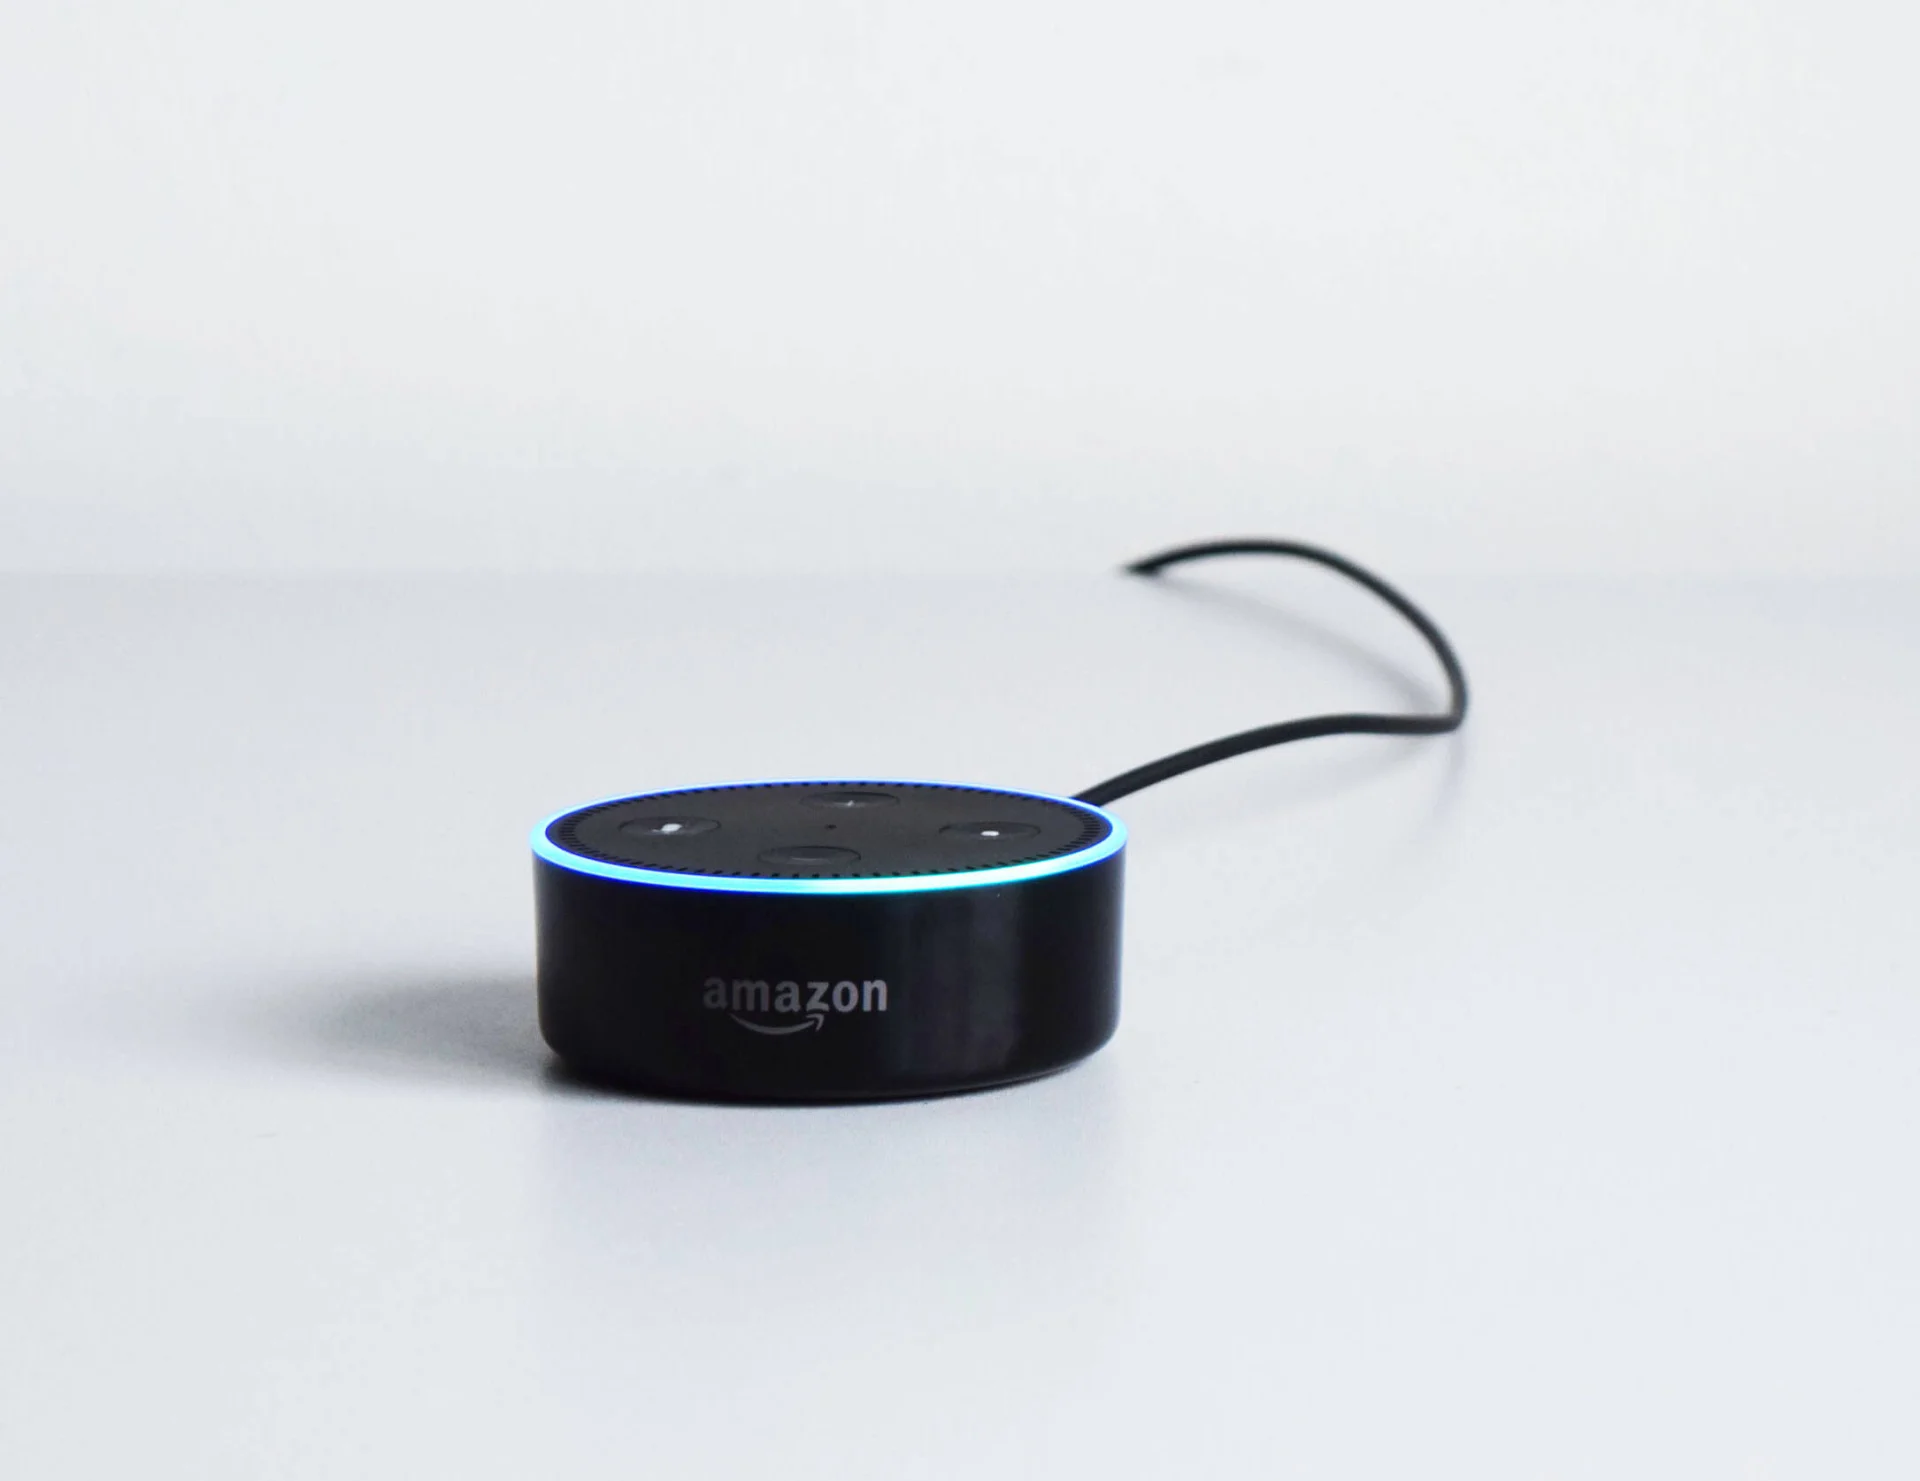
Let’s see how this works with an example. The DUT for this article is an Amazon Echo Dot, one of the most popular smart speaker models on the market. The concepts discussed here apply to any kind of smart device.
The Amazon Echo Dot device contains both a loudspeaker and a microphone array that can be tested individually in an open loop configuration.
Amazon Echo Dot
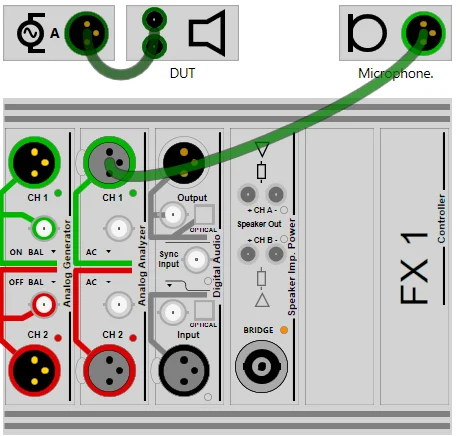
4) Hardware setup
The setup for measuring the Amazon Echo Dot consists of
- FX100 Audio Analyzer,
- Calibrated M2010 measurement microphone to pick up signals from the DUT loudspeaker
- Calibrated NTi Audio Talkbox as a sound source, to play signals to the DUT microphones
- A Notebook or mobile device to access the Amazon Echo Cloud services.
5) Amazon Echo Dot loudspeaker test
a) Media library
The test signal file called “TestSignal” is pre-generated and stored in a local or cloud-based media library. To play the “TestSignal” file, the smart speaker is prompted with an appropriate voice command. That voice command is also pre-generated, stored on the Audio Analyzer, and played through a separate loudspeaker near the DUT. The complete loudspeaker test in this configuration is performed in three steps:
- The Audio Analyzer plays the pre-recorded voice command “Alexa, ask my media to play TestSignal” through the loudspeakers near the DUT.
- The Amazon Echo Dot detects the voice command through its microphones and responds by playing the “TestSignal” track from the media library through its own loudspeaker – the loudspeaker under test.
- The loudspeaker signal is captured by the calibrated measurement microphone directly into the Audio Analyzer and the measurement results are displayed.
b) Loudspeaker Test signal
The audio track “TestSignal” is used to test the loudspeaker parameters and consists of three parts:
- 1kHz / 1s sine wave. This is to settle any signal processing algorithms (e.g. automatic gain control).
- Trigger signal sequence. This is a signal that is recognized by the Audio Analyzer. It triggers the analyzer to start the data acquisition. Also, the trigger signal is used to correct any differences in sampling rate between the DUT and the Audio Analyzer.
- 100Hz-10kHz / 1s GlideSweep signal. This sweep is the actual signal analyzed during the measurement. All relevant measurable parameters for the loudspeaker are measured in parallel.
The “TestSignal” file can be produced directly from the FX-Control software in .mp3 or .wav file format.
c) Loudspeaker Test parameters
The loudspeaker measurement parameters determined in this test are:
- Frequency response in dBSPL
- Distortion response in %
- Sensitivity @ 1kHz in dBSPL
- THD @ 1kHz in %
- Steepness (Rub&Buzz) response in Pa/s
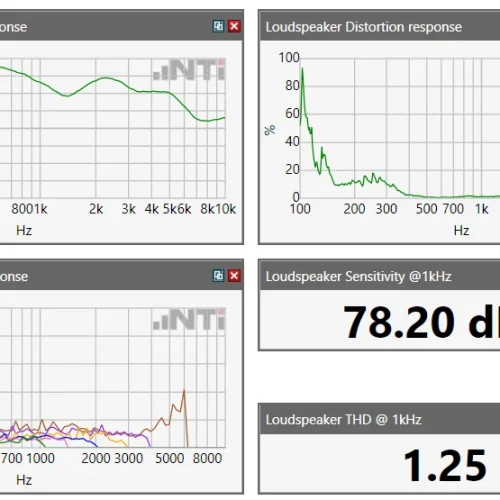
Loudspeaker Test Parameters
d) Bluetooth interface
Alternatively, the Amazon Echo Dot can play audio from a Bluetooth source. Therefore, the “TestSignal” file can be played by the Audio Analyzer and sent to the DUT via a Bluetooth converter. This is a “Closed Loop” signal chain.
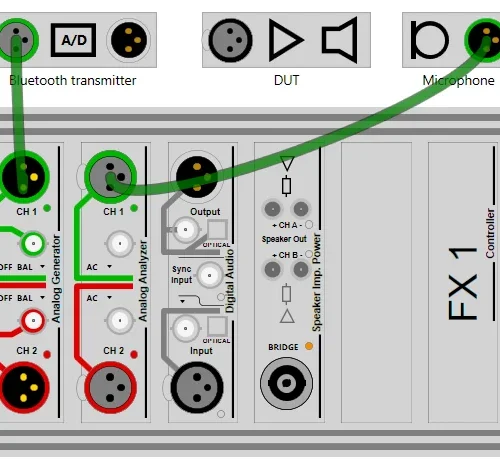
Closed Loop System
6) Amazon Echo Dot microphone test
Unfortunately there is no way to acquire the Amazon Echo Dot microphone signal directly. Therefore there is no closed loop measurement setup available.
a) Access the Amazon Echo command history
There is, however, a way to record a test signal with the DUT microphone and access that recording a few moments later.
Whenever the Amazon Echo Dot recognizes the keyword “Alexa”, it immediately starts recording audio until the signal level drops below the background noise.
Furthermore, these recordings are available to the user through the Amazon Alexa app either through a web-browser or through a mobile device.
By using these two features, the procedure for testing the Amazon Echo Dot microphone is
- Play the microphone test signal. This signal is headed by the voice keyword recording “Alexa”
- After a few seconds the recording of the test signal is available for playback from the Amazon Alexa app. This signal is played back by the operator and fed back electrically into the FX100 Audio Analyzer. The measurement results are displayed.
b) Microphone Test signal
The microphone test signal starts with the voice recording of the keyword “Alexa” to trigger the recording on the Amazon Echo Dot.
After that, the signal has the same structure and functionality as the loudspeaker test signal mentioned earlier.
c) Microphone Test parameters
The microphone measurement parameters determined in this test are:
- Frequency response in dBV
- Distortion response in %
- Sensitivity @ 1kHz in dBV
- THD @ 1kHz in %
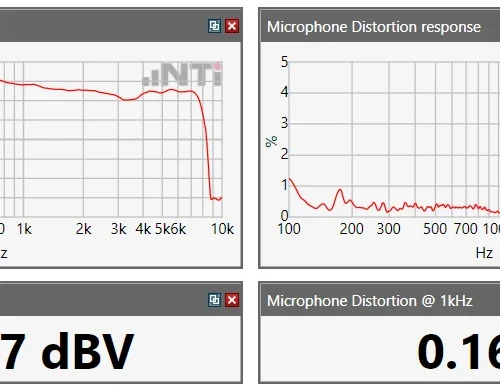
Microphone Test Parameters
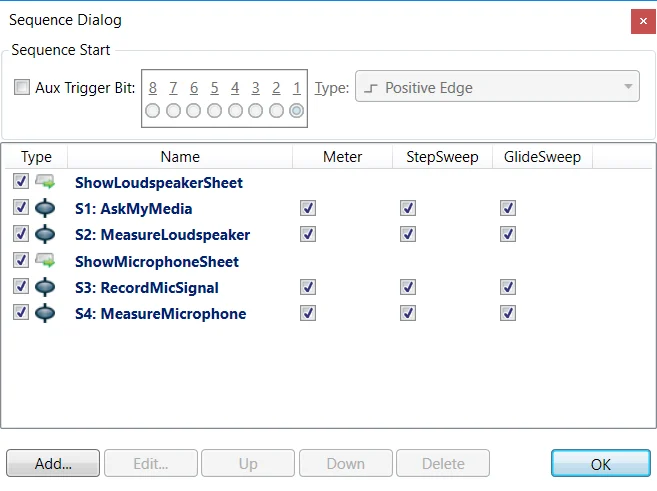
7) Combining the tests in a sequence
The complete sequence of signals played and measurements taken can be easily implemented into the FX-Control Sequencer.
Within a few seconds, the complete acoustic parameters of both the microphone and the loudspeaker in the smart device are characterized.
Here’s a link to a video that shows the measurement sequence.
Combining Test Sequence